Wednesday, September 26, 2012

Welcome Fall!

Now, I am a Florida girl born and raised.  I adore sunbathing, bikinis and the sounds of the waves breaking on shore.  I also despise the cold.  I hate snow like most people hate spiders.  Can't stand it.  While flurries don't bother me, I was 'in' snow once and literally started dry heaving from feeling so claustrophobic in my own layers upon layers of clothing.  BUT...while the leaves don't change here and the seasons are far more blurred, I relish in the short time when we can start to feel the fall air, when walking outside requires a 10 minute walk before my pores start sweating something fierce and when the smell of pumpkin lattes fills the air and Halloween and fall decor start hitting the store shelves.  I love this time.  It's not too hot but it's not cold yet.  The air feels good, the kids can finally play outside without fear of heat stroke.

Fall is upon us which means so is the threat of having to buy pants one size larger come January.  Not me.  This is the one time of year I pay closER attention to what I shovel into my cake hole.  Unlike most people who indulge in super fattening foods, my diet remains the same.  Light on the meat factor (i.e. occasional seafood), no more than 1-2 eggs per week (even in baking!) and NO bovine breast milk whatsoever!

Eating healthy is not nearly as hard as it sounds when the abundance of seasonal veggies adorns the produce department at your local grocer beckoning to you through those thoughts of butter cookies and lard filled 'comfort food' dancing in your cranial sector.  During my most recent visit to Publix, I stopped in awe to gawk at the gorgeous display of fall fruit before me.  So many to choose from!  Pumpkins, spaghetti squash, acorn squash, butternut squash, sweet dumpling squash!  Undecided on the dinner menu for the night, I grabbed 2 Sweet Dumpling Squash and started craving a fall curry soup.  And so it goes...


Harvest Curry Soup w/ Curried Roasted Seeds
makes enough soup for 4, but if you want squash 'bowls', you'll need one for each person.  

2 Sweet Dumpling Squash (choose 2 that will sit nicely upright stem-side down)
1 medium sweet onion, sliced or coarsely chopped
4 cloves garlic, halved
1 can light coconut milk
2 Tbsp red curry paste
Curried Roasted Seeds for garnish (recipe below)

Curried Roasted Seeds
seeds from 2 sweet dumpling squash
1 1/2 Tbsp coconut oil
1 tsp sea salt
1 tsp curry powder
dash coriander

Preheat oven to 375 degrees.

Cut the top 1/3 off of the squash so that the larger portion will sit as a bowl, stem side down.  Use a spoon to spoon the 'guts' and seeds out into a colander.  Place the squash in a casserole dish, cut-side down in about 1" of water.  Bake for 35min.


While this is baking you can prepare the seeds.  Wash seeds in a colander.  Transfer seeds to a bowl and fill with water.  The seeds will float and the guts will sink.  Use your hands to separate the seeds from the pulp that is still stuck.

When the seeds float and the majority of the pulp is removed, you can scoop the seeds out back into the colander for one more good rinse.  Then dump into a towel and lightly dry.  In a small bowl, place the seeds, coconut oil and seasonings.  Toss to coat.  I made mine in the toaster oven at 300 degrees for 35 minutes.  Likewise, you could wait until the squash is done and reduce heat to cook.  Set aside for garnish and snacking.


Toss the onion and garlic halves in a pan on medium-high heat coated with non-stick spray or a very small amount of oil.  Cook just a few minutes until the onions & garlic brown.  Remove from heat.

When the squash is done, scoop out the flesh into your blender or food processor.  Reserve the 'bowls'.  To the squash, add the onion & garlic, curry paste and coconut milk.  Blend until desired consistency   I wanted a smooth soup so I blended in my Vita-Mix for about 20 seconds or so.  This makes a thick soup.  If you want is runnier, add more coconut milk, water or a 'chicken' broth until desired consistency is reached.  Pour into your fancy schmancy bowls and eat up sista!


Thursday, September 20, 2012

It's a party!

Planning a party for a one year old is fun.  Why?  Because they don't give a shit what theme you choose, what foods you serve or even who attends.  It is a celebration for the parents to show off their pride and joy and a time where we can let other people shower our little labor of love with more presents than we can logically fit into the cubic space provided in his room.  We get to invite OUR friends.  Not the pink princess drama-queen clan my daughter would insist she have over.  Our friends.  We eat, we do cake and presents and we serve cold beers.  Its a blast. 

I am a party fanatic.  Really.  It's a sick obsession I have.  I go all out.  My husband and I throw a few parties every year that only adults attend and up until this point I was lacking in the 'kid party' department.  While I threw decent parties, I was never good at coming up with the same ridiculously creative ideas I did for our adult Halloween party or our annual Luau.  I would buy cheap decor from the local party store and call it a day. 

That was my plan this time.  Jonah adores dogs.  A dog party it was.  Except I had nothing but 2 plastic dogs I planned on adorning his mediocre cake with. 

That was until 3 days prior to the party when I FINALLY figured out this miraculous wonder I kept hearing about: Pinterest.  This was at 3:30am when I got up to pee.  I brought my phone with me to potty and that's where I fell in love with Pinterest.  We had a love affair in the bathroom for exactly one and a half hours.  Not only did I learn a few things, it got my creative juices flowing and while I did copy a few ideas I had seen, I came up with a few of my own too!  So, I changed the theme 3 days before the party from: dog to: Nautical.  Why hadn't I thought of this?  His name is Jonah, after all.  His entire nursery is done up in a nautical theme.  I was so stupid!  This was going to be awesome!  And it was....

This was the table spread.  Impressive, huh...huh?  Yeahhhh.  I did that.  Using decor from his room and other beachy decor from the house, I 'just threw' this together.  I'm so talented.  (lol)

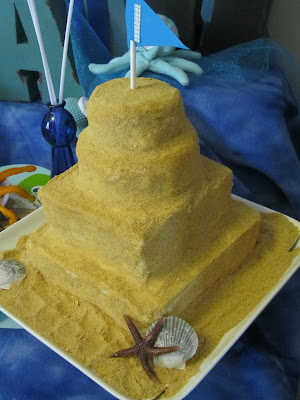
This was the cake.  My own idea.  I made SIX freaking batches of cupcake mix from Isa Chandra Moskowitz's (of PPK) book Vegan Cupcakes Take Over the World.  I layered 2 square cakes for the base.  2 round cakes, which I cut into smaller squares for layer 2, and used smaller sized spring form pans for the upper 2 layers.  I used my own recipe for vegan Buttercream Frosting (see below for cake tips)

This was a Pinterest find. LOVE the idea!
This is a trifle bowl that I served Asian lettuce wraps in.  Recipe below.
Another Pinterest idea.  SOOO cute!
Eggless tuna salad on cuke rounds.  Recipe below.

My sweet baby boy.
 
 Cake Tips & Frosting Recipe

I am by no means a pro at this, but here are the tips I have learned. 

-To prevent frosting from tearing your cake apart when you ice it, freeze the cake first.  For example: for the bottom layer, I used 2 9" square pans (=2 recipes Golden Vanilla Cupcakes from PPKs book, 1 each pan).

-Allow to cool completely.
-Put the first cake right-side-up onto a platter.  Smear with lots of icing to fill in the cracks.  Put the second layer upside down so the super-flat bottom end is up and makes a nice smooth surface to work on.  Use icing to fill in the sides and make the sides smooth.  Then freeze.  Do this with each complete layer.  When those are frozen, take them out and stack them using more frosting.  Freeze again.  When ready, take the frozen stacked cake.  You can use a SERRATED knife to cut or shape your cake.  Then, working quickly so I didn't tear the cake apart with my iced spatula, I iced the entire cake, making it as smooth as I could.  Since this was a sand castle cake, I wasn't too picky.  Then, I used organic graham cracker crumbs, blended to a fine powder, pressed into the sides of the cake.  When I was done, I refrigerated it until it was time to set the table. 

Dairy-Free Buttercream Frosting
1/2 C vegan butter
1/2 C non-hydrogenated vegetable shortening
1 tsp pure vanilla extract
1 Tbsp vanilla flavored non-dairy milk
4 1/2 C organic powdered sugar

Using a handheld mixer, cream the butter, shortening, vanilla and 'milk' together.  1/4-1/2 C at a time, blend in powdered sugar at medium speed.  Depending on the thickness of frosting, you can use more or less sugar.  I find 4 1/2 cups is perfect for a thick frosting that won't run. 

Asian Lettuce Wraps
2 Tbsp peanut or sesame oil
2 packages tofu, drained, pressed and cubed
2-3 bunches soba noodles, or small pack of udon brown rice noodles
1/2 red cabbage, shredded
1 bunch green onions, cut into 1" sections, white and green parts
3 large carrots, shredded
1 red chili, sliced
1 8oz can water chestnuts, sliced
1 clove garlic, minced
1" piece of ginger, minced or grated
1/3 C tamari or other natural soy sauce
1 tsp toasted sesame oil
2 tbsp brown sugar
2 tbsp rice vinegar
1 tbsp ketchup
Lettuce leaves (I used romaine)

Heat oil in large wok.  Toss in tofu and cook over medium-high heat until browned.  About 10 minutes. Remove from wok.  Cook noodles as per package directions, drain and rinse with cold water.

Toss all veggies into wok, including garlic and ginger.  While it cooks, whisk tamari, toasted sesame oil, sugar, vinegar and ketchup in small bowl. 

Cook veggies until fork tender, about 5-8 minutes.  Throw tofu, noodles and sauce into wok and mix with veggies.  Cook an additional 2-3 minutes until sauce thoroughly coats everything. 

Serve with lettuce leaves and scoop mixture into leaves and eat like a taco.


Arugula Tuna Cukes
2 cucumbers, sliced
2 roma tomatoes, sliced
2 cans of  light tuna (troll or line caught! - be eco friendly!)
1/2 c loosely packed arugula
1 1/2 celery ribs chopped fine
1/4 c vegan mayo (i know, i know, this is not a vegan dish...but i do NOT eat real mayo. hello artery clogging goodness.  Yuck.)
1 tbsp prepared mustard (or use Dijon, German, spicy brown, etc)
1 tsp lemon juice
1 clove of garlic, minced
1/4 tsp sea salt
1/4 tsp ground black pepper

Place tomato slices on top of cucumber slices.  Mix remaining ingredient together and place a small dollop of tuna salad on each round.


Tuesday, September 18, 2012

Kale Chips 3 Ways

In an attempt to keep finding new healthy foods my kids will eat, I decided to play with kale chips.  I had made them before and assumed my daughter wouldn't touch them, but I had a hankering for some so I figured I'd bring Addison in on the fun and hope she didn't have to choke it down.  I mixed the coatings and while she ripped the kale, 'massaged' the dressings into it and spread it on the dehydrator trays.  The result?  3 tasty flavors of chips that she actually ate and begged for more!  The Cheezy Chipotle were both of our favorites but we enjoyed them all.  I only used a 1/2 bunch for each recipe, but you can easily double it.  One half bunch of curly kale yielded 2 1 full tray of chips for us. 

I have a 9 tray dehydrator.  If you do not, you can still make these.  You can either purchase a regular 3-5 tray round dehydrator from your local home store for around $30 or you can dry them in the oven at a super low setting for a few hours. 

*Note: I soaked my cashews prior to use.  Some people ask why raw food generally uses soaked nuts and it is because soaking them removes the 'enzyme inhibitors' and allows us to utilize the maximum amount of nutrients and enzymes that the nut has.  Soak cashews for 30-60 minutes, rinse and let sit in a colander for about 20-30 minutes to drain. 


Cheezy Chipotle Kale Chips
1/2 bunch kale
3/4 c soaked cashews
1/4 c nutritional yeast
1/2 tsp onion powder
1 garlic clove
3/4 tsp chipotle powder
1 tsp raw honey
juice from 1/2 lemon
1/2 tsp apple cider vinegar
1/4 tsp salt
1/4 c filtered water

Rip kale leaves from ribs and put into a bowl.  Using a high speed blender, mix the remaining ingredients until smooth.  Scoop onto kale and using your hands, dive right in and mix it all until leaves are evenly coated.  Spread leaves onto dehydrator tray and dehydrate at 104 degrees for about 8 hours, give or take until desired done-ness is reached.

Honey Mustard Kale Chips
1/2 bunch kale
3/4 c soaked cashews
1/4 c nutritional yeast
1/4 c raw honey
1 tsp apple cider vinegar
3 tsp dry mustard powder
1/4 tsp salt
juice of 1/2 lemon
1/8 tsp onion powder

Rip kale leaves from ribs and put into a bowl. Using a high speed blender, mix the remaining ingredients until smooth. Scoop onto kale and using your hands, dive right in and mix it all until leaves are evenly coated. Spread leaves onto dehydrator tray and dehydrate at 104 degrees for about 8 hours, give or take until desired done-ness is reached.

Savory Sun Dried Tomato Kale Chips
1/2 bunch kale
2 tbsp sun dried tomatoes, not packed in oil
1/4 c water, plus 3 tbsp
1/2 c pine nuts
1/2 tsp sweet white miso
2 tbsp nutritional yeast
1 clove garlic

Rip kale leaves from ribs and put into a bowl. Soak sun dried tomatoes in 1/4 c water for 30 minutes.  Using a high speed blender, mix the remaining ingredients, including the sun dried tomatoes and the soak water until smooth. Scoop onto kale and using your hands, dive right in and mix it all until leaves are evenly coated. Spread leaves onto dehydrator tray and dehydrate at 104 degrees for about 8 hours, give or take until desired done-ness is reached.